Hello.. It's have been almost a week I didn't update my blog. Seriously i'm lack of idea. Haha. But today i've got something to share with you all. An easy to understand photoshop tutorial. Ok. Maybe you have ever see this kinda picture before but you did'nt know how to create it :
Have you ever see this kinda image? For those who did'nt, here come the tutorial. Seriously, it's an easy one. I've made a video below but i'm really about it's bad quality :(
Hehe.. It's easy isn't it? You can even finish it in a short while. I'll expand it one by one :
1. Launch your Photoshop. Here i'm using Adobe
2. Open the image file that u want to use
3. Crop the image nicely (if u want to use other background other than the original one)
4. After cropping, create a new layer under the image layer. Fill the layer with dark color (eg : black)
5. Create other layer above the background. Now we will create an effect similarly like gradient on the layer. The easiest way : choose brush mode and change the size to as u want depend on the image. You can u any Color and I prefer the dark one. In the video, i've used grey color
| 6. Point the brush to the layer that you've created. Then, navigate to Filter --> Blur --> Gaussian Blur and set the pixel to 250 @ anything suits you. |
8. Set your brush :
- Brush type : choose 'hard round'.
- Size is depend on the image size (eg : 24px).
- Color : White @ any bright color.
| 9. After finish setting up your brush, select pen tool mode and use 'path' mode. Path mode means any shape created will act as the a marking purpose. |
10. Then create a wavy lines on the layer. In the video, i've created the path starting from the hand until the foot. Create the corner nicely and smooth. Do it slowly as wee need a good quality output.
11. Then right click whereever on the line and choose 'stroke path'. Select 'brush' and check 'simulate pressure'.
12. Tadaa.. see? ok. You've just finish creating the line, now delete the original path using delete key on keyboard. Poof.. Line is now gone.
13. Next step, choose a hard type eraser tool. The size is depend on you but i suggest to use a bigger size eraser.
14. Erase the line interval-interlaced similarly just like i've done in the video. The purpose is to make the line look intertwine at the object.
15. Finish? Ok. Now right click at the layer and select 'blending option'
| 16. Check the tabs 'outer glow' & 'color overlay'. In outer glow u should use a bright color. To make it easy, i've used blue color. In Blend mode you can use 'screen'. Anddo a customization on 'opacity' & glow 'size'. For 'color overlay' again, i've choose blue. Ahaha.. yess.. i love blue color :P. Color overlay actually is not important. It's just an optional if u want to change the line color. |
18. Now we go to Scatter Bubble technique.
19. It's the same way to create scatter. It's just a slight set up that u must adjust in brush settings.
20. Change the brush size to a more bigger size (eg : 45px). Use a bright color like yellow, blue, green, etc.
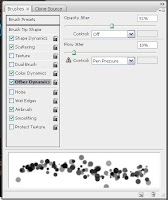
21. Navigate to window toolbar and select brushes. In brushes window, check the box for 'shape dynamics', 'scaterring', 'color dynamics', 'other dynamics', 'airbrush' & 'smoothing'.
- [this is the basic setting that I always use]
- shape dynamics : -size jitter 100%, control pen preassure
- scaterring : -both axes, 500%, control pen preassure
- color dynamics : - hue, saturation & brightness jitter 50%
- other dynamics : - opacity jitter 50%, flow jitter 10%, control pen preassure

23. You are now fully done. Go add up anything and be creative. Lastly, congratulation coz you've just successfully learn something new :)
p/s: Just ask anything if you cannot understand this tutorial. I'll try to answer and help. That's all ; the first photoshop tutorial for this blog ~xD
Baca dalam Bahasa Malaysia


